You can add six types of form elements to a spreadsheet: Combobox, List, Checkbox, Button, DataPicker, and Label. These elements are available in the Insert menu in Jedox Web.

Format Control Dialog
Each form element can be formatted to suit your document. After selecting a form element, the FORMAT CONTROL dialog is displayed.
The following tabs are available: General, Size & Position, Layout options, Font, and Actions.
- In the General tab, you can define the name, the data source or value and the target of the form element.
- In the Size & Position tab, you can enter pixel data for the size and the position and “TRUE” or “FALSE” for visibility.
- In the Layout Options and Font tabs, you can choose the formatting options. Note that font sizes for Comboboxes, Lists, and DatePicker form elements cannot be changed.
- In the Actions tab, you can select a specific action which will be executed by clicking/using the respective form element.
Combobox
A Combobox can use a formula, a Subset or an ODBC query as a source.
If you want it to use a Subset from a large dimension (more than 1000 elements), make sure you enable the Large Subset checkbox.

The target can be a cell/range, a named range, or a variable. For example, the named range Combobox1 has a Subset of the dimension “Regions” of the database “Demo”:
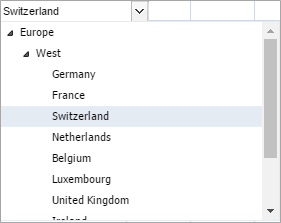
In the case above, the named range Combobox1 has the value "Switzerland". You can also search for a specific value by typing in the Combobox.
If the target of an object is a cell/range, this range will not automatically be updated if the worksheet is renamed. After renaming the sheet, the object has to be edited to utilize the new sheet name in the target range.
To use a Combobox form element in combination with a DynaRange, see Example: Report with Combobox and DynaRanges.
List
The List form element behaves in a similar way as the Combobox form element, but it also allows any multiselection of elements. The screenshot below shows an example of a List element in a spreadsheet.

Multiselection of List elements is only possible if, in the Layout Options tab the value of the Multiselect option is “TRUE” (which is the default setting). When enabled, there is a short waiting period of approximately 1 second after you click an element in the List. After this period, the result of the selection is sent. This delay prevents unnecessary recalculation of the worksheet while you are still selecting elements.
Displaying the selected values in Lists
You can display the selected values in "List1" in an array as named range definition as in the screenshot above or as variable definition shown in the screenshots below. In both cases, the different values are only displayed if the array cells are in a row. If the array cells are in a column, only the first value will be displayed in all cells of the array.


In the Layout Options tab, you can also select whether the List should be Collapsible or Collapsed.
To use a List form element in combination with a DynaRange, see Example: Report with List and DynaRanges.
Checkbox
You can create a Checkbox in any cell in a worksheet by selecting Insert > Checkbox.

When the Value setting is Checked, the CheckBox is given the value "True"; when it is Unchecked, the value is "False". You can choose to have the response value displayed in a target cell of your choice or have it called up with the variable names, such as a variable in an IF function: =IF(CheckBox1,A1,A2).
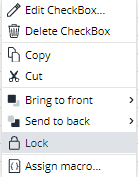
In the Layout tab, you can choose whether the background of the Checkbox should be transparent or not. You can define this separately for the designer mode and the user mode. By right-clicking on the Checkbox, you get the following context menu:
If "Checkbox1" is registered as a named range and later deleted, then the defined name "Checkbox1" has the last selected entry. The defined name "Checkbox1" is not deleted when you delete the Checkbox1.
Button
You can create a button in any worksheet by selecting Insert > Button.

You can also assign a macro to the button by right-clicking on it once you create it, and selecting Assign macro...
The Button form element has an additional Thumbnail tab, where you can select a image for the button. Allowed image file formats include gif, jpg, jpeg, and png up to 400x300 pixels. Read also Custom Thumbnails in Reports.
Note that the Button form element does not support a transparent background color. Using the "No color" setting as the background color in the "Layout" tab will reset the background color to the default color.
DatePicker
You can create a date button in any spreadsheet cell by selecting Insert > DatePicker. For this form element, you can select a fixed date or use a formula; set it as a "named area" or as a "variable"; or assign a macro to it by right-clicking on it and selecting Assign macro...
When you use a formula as a source for the DatePicker, the output needs to be a valid timestamp (integer); otherwise, the display of the DatePicker form elements might be wrong or left empty. The timestamp value can only be reset to another timestamp; it cannot be left empty. If no changes are made, it will retain the last value selected.
The DatePicker control in Jedox Web, however, does not support this. The year 1900 is not defined as a leap year. To ensure compatibility for all other dates before March 1st, 1900, the date value "60" is interpreted as March 1, 1900, by the DatePicker control, i.e. the same date as the value "61".
Label
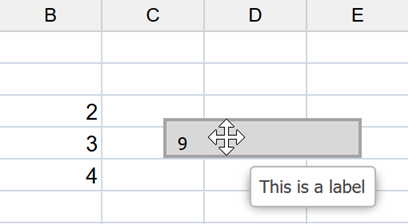
You can make free-form annotations on a report by adding labels. The label can display either a text or the result of a formula. You can also add more details about it in a tooltip. In the example below, the label will display the sum of the values in cells B3 to B5:

The following result is displayed on the spreadsheet:
The displayed text and the visibility of the label are formula-dependent. Using the SHOWPICT() formula on the label to display an image inside the label is not supported.
If a numeric value is shown on the label which has more than 15 decimals digits, these digits will be truncated when the report is exported as PDF.
Considerations when using Form Elements:
- Form elements are not moved dynamically in the spreadsheet if a row / column is hidden or if the width / height of rows / columns changes. However, if the form contains a DynaRange, the form element may be moved when the DynaRange is expanded / collapsed.
- If a spreadsheet cell contains a PALO.DATA formula and a value is set in this cell via a form element, the formula will not be overwritten. Instead, the set value is sent to OLAP for writeback.
- With the exception of labels, form elements will not be shown in PDF exports of a report.
- Form names must be valid. See Naming Conventions for Jedox Objects.
- You must use the syntax of the current locale when entering the formula, as the "Formula" source is displayed in the current locale. However, if the source type is changed, for example, from "Subset / ODBC" to "Formula", the formula will be displayed by default in English. To use the correct argument separator for your current locale, the argument must be changed manually. If you change the source type using the English locale, and then save and open the workbook using, e.g., the German locale, the formula will be displayed with the German syntax.
-
For form elements that display a formula-based output (such as the "Label" object) the output is always shown in English format. For example, if the formula returns a decimal number, it will use a period (
.) as the decimal separator, regardless of the user's locale settings.
An exception to this is the "Date Picker" form element, which displays the selected date according to the user's local date format. - Combining both an Action and the execution of a macro on Form Elements is not supported. If an Action is defined on a form element, any macros also assigned with it will not be executed anymore when clicked/used.
Updated May 16, 2025