This article describes the native Paste View dialog in Excel Add-in, which is used to create Jedox Views from a selected database.
To create a view, click on the New View button in the Jedox Ribbon. To open an existing view, click on Edit View.
The Jedox Web Paste View Dialog can also be used in Excel Add-in. This dialog you can enable by checking Use Jedox Web dialogs in Excel Add-in Options.
The native Paste View dialog in Excel Add-in has two tabs: Definition and Options, and an area for Stored Views. The Definion tab is described below.

Definition Tab
This dialog allows you to create Jedox data views on a worksheet by selecting the dimensions and elements that you want to see and how they should be arranged.

There are three areas for the arrangement of the dimension elements in the spreadsheet.
- Area of Header dimensions (4). This area is also called POV - Point of View.
- Column titles area (5)
- Row titles area (6)
After a cube is selected, all of its dimensions are displayed in the area of the header dimensions(4). You can drag and drop them in the areas you want.
The other areas of the dialog are described below.
Select server/database (1)
Here you can select the server and database for your connection from the dropdown list. This setting determines which cubes are available in the cube selection area (2).

Select Cube (2)
Here you select a cube for the view. The available cubes depend on the chosen database (1) and the database section (3).

The dimensions of the chosen cube are displayed in the header dimensions area (4).
Sections of the Database (3)
In each database there are three kinds of cubes: data cubes, attribute cubes, and user management cubes. Each type of cube is represented by a symbol, which appears next to the Select Cube dropdown menu. The symbols and cubes are described below:
| Symbol | Cubes | Description |

|
Data cubes | This module enables access to standard cubes. |

|
Attribute cubes | This part contains additional information for single-dimension elements, which are called attributes. Examples of attributes include product name in different languages, customers phone numbers, responsible person, address, etc. |

|
User management cubes | The various rights of the different users and groups are stored and controlled here. |
Header dimension area / POV (4)
The dimensions of the chosen cube are displayed in the header dimensions area (4). You can select the dimensions that you want to see as row or column titles and move them to the corresponding areas.

The remaining dimensions in the header dimensions area behave like defined page header elements. You can change the displayed element by double-clicking on them:

Note: if a dimension has a Default Read Element defined, that element will be used in the header of Views as default element. This applies to dimensions that are placed in the header area. If a Default Read Element is defined on a dimension that did not have one before, existing views will not be updated automatically.
Column titles area (5)
The elements of these dimensions are displayed horizontally as column titles. You can expand and collapse underlying child elements by double-clicking on them.

With right-click on the head cell of a column you receive sort commands:
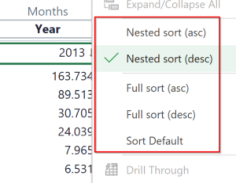
Nested sorting respects the hierarchies of the dimension on the rows in the view while sorting the data values within those hierarchies. Child elements are still shown directly below their parent (or directly above if “parents below children” option is used).
Full sorting flattens the hierarchy, sorting purely based on data values, irrespective of the hierarchies and nesting of dimensions on rows.
Row titles area (6)
The elements of these dimensions are displayed vertically as row titles. You can expand and collapse underlying child elements by double-clicking on them.

Swap (7)
This icon allows you to exchange the entries in the row titles area with the entries in the column titles area.
Show now (8)
You can examine the view before pasting or see the effect of your changes in it by clicking Show Now in the Paste View window. This works for both Jedox Web and Excel Add-in. This option displays a preview directly in the spreadsheet. You can close the preview by clicking Cancel on the Paste View window. These changes are real-time. When you click Cancel, the View will not be pasted, and contents that were modified with the dialog will not be retained.
Selecting a dimension (9)
In every area you can activate one dimension (9) - then "Select elements" is displayed (10) below it:

SELECT ELEMENTS dialog button (10)
Double-clicking this Button opens the dialog window SELECT ELEMENTS. Here you can select the elements that you want to see in the view as page headers (one cell for each dimension) or as row or column titles (cells are possible for each element of the displayed dimensions).
The following screenshot displays the dialog SELECT ELEMENTS for Customers for the Orders cube in the Biker database.

The displayed elements in area 10a depend on several settings:
In 10d, you can directly add or edit subsets. Also, if the dimension has stored subsets, you can select one of them in field 10d as preselection for the offered elements in area 10a.
For the element selection you can use a variable by checking and defining it in section 10b. This variable section is only displayed in the Designer module. In the Reports module, the section 10b is hidden for all users.
If the dimension has stored attributes, these can be used as Alias (10b).
The Alias format list (10c) shows the various ways of displaying the Alias and the element name. In the above screenshot, the attribute "City" has been selected as Alias (10b), using the Alias format "Alias - element name" (10c). You can sort the Alias names in an Ascending, Descending, or By creation order (10g).
Note that in Jedox Web, a View will not display an Alias in the spreadsheet if the given element in the dimension does not have any value for the chosen Alias. However, in the same situation, the element name would be shown as an Alias in a detached View, in the dialog itself, in a PALO.ESELECT function in a custom report, and in the Jedox Excel Add-in.
You can select single elements and/or accumulated elements in any combination. To mark several elements, hold down the SHIFT and/or CTRL key. After you have finished your selection, click OK.
You can also transfer your selection into the Picklist (10e). There are two ways to do this:
- Mark the elements in 10a and then add them to the picklist by clicking the arrow to the right.
- Double-click on the elements.
In the screenshot above the entries in the picklist are sorted in alphabetical ascending order. If anything is in the picklist, these displayed elements will be used when you click OK, regardless of what is selected in area 10a. If the picklist is empty, clicking on OK will select all marked elements in area 10a. If nothing is marked in the entire dialog window, the previous selection will be used for the View.
Buttons above the field to display elements (left window field):

|
Expand one hierarchy level |

|
Collapse one hierarchy level |
|
|
Expand all hierarchy levels |
|
|
Collapse all hierarchy levels |
|
|
Expand one hierarchy branch |
|
|
Collapse one hierarchy branch |
Buttons above the field picklist (right window field):
|
|
Toggle displaying elements in list mode |
|
|
Toggle displaying elements in tree mode |
|
|
Sort in order of creation |
|
|
Sort alphabetically in ascending order |
|
|
Sort alphabetically in descending order |
|
|
Clear picklist |
Additional buttons
You can find the following buttons under the More section:

|
Select elements on the 1st-5th level or base elements |

|
Select the entire list |
|
|
Deselect the list |

|
Invert the selection |

|
Select the branch |
Notes about the SELECT ELEMENTS dialog:
- The elements in the left window are displayed only in tree mode (hierarchical display).
- The button to toggle between list mode and tree mode refers to the view of the selected items in the picklist. Note that when the list view mode is enabled, defining filters for this dimension via the context menu of the pasted view is not supported.
- When searching for elements with the search field, the search will now by default select the first found element (not all matching elements). With the next click on the search icon, the next matching item will be displayed.
If you select SELECT ELEMENTS for a dimension in page area, you will receive a different dialog that doesn't have a picklist but has the additional possibility of using a function after the selection of multiple elements. See Creating a Jedox View for more information.
The option "Hide empty elements" cannot be set when zero suppression is enabled in Paste View Options or in the Excel Add-in Ribbon.
Updated March 27, 2024