You can insert element names into your Jedox Spreadsheet using the Paste Elements feature. It is particularly suited to individual structuring of data in the worksheet.
In Jedox Web, it is available in the Query toolbar:

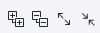
In Excel Add-in, you can access it on the Jedox ribbon:

You will receive the native Excel Add-in Paste Elements dialog or the Jedox Web Paste Elements dialog. It depends on whether the checkmark Use Jedox Web dialogs in Excel Add-in Options is checked or not.
Since there are minor differences between the two dialog versions, only the Jedox Web Paste Elements dialog version is described below :
With the Paste Elements dialog you can insert Jedox element names or attribute names in a worksheet in a very simple way.

Below are descriptions of the various components of the Paste Elements dialog. Please refer to the numbers in the screenshot above.
1 Select Server/Database
This selection determines which dimensions you have access to. After selecting a database, all corresponding dimensions will be listed.
2 Hierarchy buttons
From left to right:
- Open all hierarchy levels
- Close all hierarchy levels
- Open selected hierarchy branch
- Close selected hierarchy branch
3 Subset
If the dimension has stored Subsets, you can enable these as preselection for the offered elements in this dropdown menu. Any default stored Subset is also selected by default in Paste Elements. In the screenshot above, the default Subset Sales_North has been selected. If you delete the default Subset, an error message is displayed when you open the Select Elements.
4 List of elements
The available elements are listed here, displayed as element names or attribute names (see item 5), as list or hierarchy (see item 7), and prefiltered (if applicable) by Subset (see item 4).
You can select single elements and/or accumulated elements in any combination. The dialog loads only elements for the dimension level that is currently displayed, rather than retrieving full dimension content, which allows it to display the results more quickly.
You can only handle elements of one dimension at a time.
Note: if the dialog has to load a flat, large list of elements (e.g., a large list of direct children for an expanded parent) or when using the Expand All button on a highly complex dimension, the results can still take some time.
Click Paste to insert your selection into the spreadsheet cell. If you have selected more than one element, you have the option to paste vertically or horizontally. You can also transfer your selection into the Picklist on the right (see item 8).
5 Alias
If the dimension has stored attributes, you can use this selection box to change between the elements and their attributes. Alias allow you to add more context to the elements. For example, the dimension element name of a balance sheet account might be a numeric ID, while the attribute "Name" includes its readable name. When choosing "Name" as an Alias, it is easier to understand the balance sheet structure by looking at a readable name instead of an account ID. Note that the desired Alias output can only be displayed and selected if it has been declared as an attribute of type "string". In the above screenshot, the attribute "City" has been selected as an Alias.
6 Alias format
You can see all available Alias formats in the opened list in the screenshot above. In this example the Alias format "Element name - alias" has been selected. As such, the first element under "Denmark" will be displayed as "Brakes and Gears - Aalborg". Note that when using an Alias format, the search functionality will only search for Alias values, not for element names or the combination of element name and Alias.
7 Button to change View
Hierarchical view of the elements:

List view of the elements:

Note: In the list view, the hierarchy buttons (see item 2) have no function.
8 Arrow buttons
Use the arrow buttons to switch the elements between the left and the right window or to move the elements in the Picklist field up and down.
9 Picklist
Using the Picklist has two advantages over pasting them directly (as explained in item 4 above): here you can rearrange the order of the elements and also insert the same element multiple times.

In the screenshot above, the branch "Spain" and its sub-elements have been selected for the Picklist. The Alias format is Alias - element name, with "City" as Alias, and the Picklist is sorted in alphabetical order. Finally, the branch heading "Spain" has been moved from the top of the list to the bottom.
There are two ways to get the desired elements into the Picklist:
- Double-click on the desired elements in the left window.
- Mark the desired elements in the left window and then click the arrow pointing to the right. To mark several elements, press the SHIFT or CTRL key while clicking on the elements.
To rearrange the order, select an element in the Picklist and use the corresponding arrow in the middle. Alternatively, you can sort the selected elements in ascending or descending alphabetical order by using the buttons at the top of the Picklist. The button to the right of the alphabetical sorting buttons clears the Picklist.
If the Picklist is empty, clicking on OK will select all marked elements in the window area on the left side. If there are elements in the Picklist, it doesn’t make any difference what is selected in the left window area. If nothing is selected in the left window area and the picklist is empty, the OK button is not active.
10 Selection buttons
Rather than selecting elements individually, you can use the following selection tools to select a group of elements based on their branch and hierarchy. These tools will be displayed when you click on More in the bottom-right area of the dialog. The tools are described below:
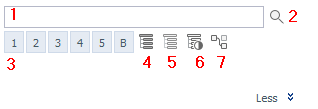
1: Search field to type in a string pattern.
2: Search & Select: searches for the pattern in the field.
3: Select all elements on a specific hierarchy [1]-[5] or all base elements [B].
4: Select all
5: Deselect all
6: Invert selection
7: Select branch
Updated March 30, 2026