Return to Sales Model Overview.
The Sales model is a prebuilt, configurable Jedox application that includes an OLAP database, reports, Integrator procedures, and settings. It is available in the Jedox Marketplace.
Installing the Sales model from the Jedox Marketplace
- In Jedox Web, open the Marketplace panel. Select the Sales model and click the Contact me button to get in touch with Jedox Support. Note that for models that are already installed locally, the user will be shown an “Open” button, which will open the model’s reports.
-
After receiving the file, navigate to My Models and select Install from file and drop your model file into the 'Install Model from File' dialog.
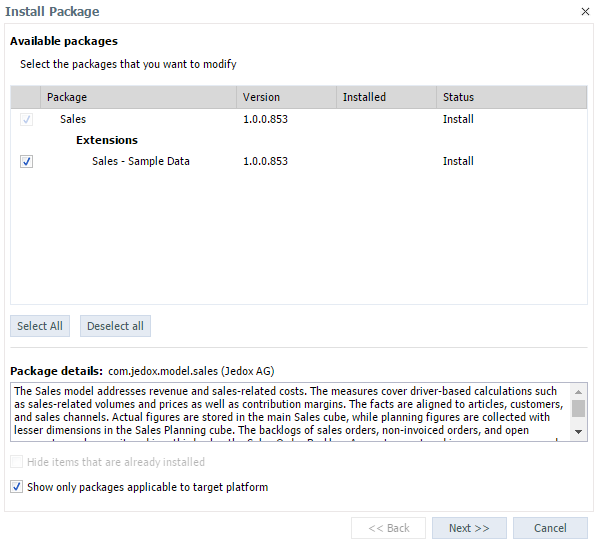
- The Install Package wizard shows the mandatory and optional packages for the model:
The model comes with the extension package Sales - Sample Data, which is selected for installation by default. This package contains dimension elements and figures for demonstration and education purposes. This sample data extension package is optional and can be turned off. Without the sample data, the model is ready to be configured to customer-specific needs, but before configuration, cubes and reports will mostly appear empty and may display errors.
Click “Next >>”. - The next page shows the license agreement for this package. The acceptance of the license agreement is mandatory to continue with the installation. Select “I accept the agreement” and click “Next >>”.
- The last wizard page shows a summary of the packages selected for installation and the chosen action (install, upgrade, or uninstall). Click “Finish” to start the installation procedure
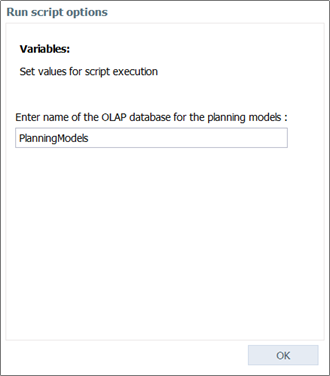
- During installation, the wizard prompts for the OLAP database name:
Accept the default database name or enter any other database name. If the database does not exist prior to the installation, it will be automatically created and populated with all database objects (such as dimensions, cubes, rules, etc.) that come with the installed packages. If the database does already exist, any missing database objects will be automatically created. If any of these objects already exist (e.g. because the same or another model sharing the same objects has been installed previously on that database), the creation of that object is skipped without any error. Multiple models installed on the same OLAP database can share their configuration and benefit from integration between cubes.
The name of the OLAP database for a model is saved in the model settingsystem.database. For more information, see Models (Platform).
Updating an installed model when a newer version becomes available in the Jedox Marketplace
- Export all added or modified files in the Models file group in Report Designer. The update will completely remove and replace the file group. Repeat for added or modified elements in Scheduler and Integrator. Added database objects and data in the OLAP database will remain, unless they are part of the packages being updated.
- In Jedox Web, open the My Models panel. If there is a newer version of the Sales model available in the marketplace, the version number and an update button are shown. Click “Update” for the model.
- The Install Package wizard shows the packages to be updated with status “Update”. Click “Next >>”.
- The last wizard page shows a summary of the packages selected for update and the action "Update. Click “Finish”.
- Restore the files, tasks, and projects saved in step 1. For modified web reports, such as
//Models/Sales/Configuration Reports/Stylesheet/Sales.wss, restore only a single file at a time using import or drag-and-drop. Do not restore multiple files or import a*.pbfile, because this procedure would recreate the restored files with a new internal ID, thus breaking the links between multiple web reports.
For more information, see Models Lifecycle and Updates.
Repairing an installed model
An installed model that has been damaged can be repaired with the Repair Package wizard, which essentially performs an uninstallation followed by an installation on the same database.
- Export all added or modified files in the Models file group in Report Designer. The update will completely remove and replace the file group. Repeat for added or modified elements in Scheduler and Integrator. Added database objects and data in the OLAP database will remain, unless they are part of the packages being updated.
- In Jedox Web, open the My Models panel. Right-click on the Sales model and select “Repair”.
- The Repair Package wizard shows the packages to be repaired with status “Repair”. Click “Next >>”.
- The last wizard page shows a summary of the packages selected for repair and the action "Repair". Click “Finish”.
- Restore the files, tasks, and projects saved in step 1. For modified web reports, such as
//Models/Sales/Configuration Reports/Stylesheet/Sales.wss, restore only a single file at a time using import or drag-and-drop. Do not restore multiple files or import a*.pbfile, because this procedure would recreate the restored files with a new internal ID, thus breaking the links between multiple web reports.
Uninstalling the Sales model
- In Jedox Web open the My Models panel. Right-click on the Sales model and select “Uninstall”.
- The Change Package wizard shows the packages to be removed with status “Uninstall”. Click “Next >>”.
- The last wizard page shows a summary of the packages selected for uninstallation and the action "Uninstall". Click “Finish”.
- The above procedure removes the model from Reports, Report Designer, Scheduler, Integrator, and Administration Settings. However, the OLAP database is not removed. If the database is not used by other models and all data contained in it can be removed, then the database can be removed manually. To do so, open the Modeler panel, right-click on the database, and select “Delete …”.
Updated November 27, 2025

