When it executes tasks, the Scheduler sends e-mail notifications that you can configure with variable blocks in Jedox Web. These e-mails can contain information about task name and status, ETL job or project names, start date/time, end date/time, duration and error messages that have occurred during the task.
Creating and configuring a template
To configure an e-mail template, follow these steps:
- Go to Jedox Web > Scheduler > Templates:

- The Templates tab opens, allowing you to see already created templates and create new ones:

- Click Add New to create a new template.
- Name your template. For example, Default ETL Success.
- Add the content of your e-mail in the E-mail template section. Click any of the buttons under the text editor to insert a variable.
- Click Save. Your template is now available in the templates list.
Additionally, you can edit an existing template by selecting it from the list and making changes in the text editor.
You can delete a template by clicking the Delete button above the template list.
Note: You cannot delete default templates.
You can use the following variables for template configuration:
| Button | variable | Definition | Additional variables / formats (without a button) |
| Task name | ${taskName} | The name of the scheduled task. | |
| Task status | ${taskStatus} | The status at the end of the task, e.g: Completed successfully. | |
| Start date | ${startDate} | The date the scheduled task was started. | ${dates} variable has two methods .start() and .end()
both methods return java.util.Date type Examples: Start Date and Time: ${dates.start()?string("dd.MM.yyyy, HH:mm")} End Date and Time: ${dates.end()?string("dd.MM.yyyy, HH:mm")} |
| Start time | ${startTime} | The time the scheduled task was started. | |
| End date | ${endDate} | The date the scheduled task has ended. | |
| End time | ${endTime} | The time the scheduled task has ended. | |
| Duration | ${duration} | The time it took for the task to finish. | ${duration} returns number of milliseconds. ${duration} variable is extended to support full, minimal and formatted output.
or mm:ss.SSS (if duration is below an hour) or ss.SSS (if duration is below a minute). ${duration.full()} returns hh:mm:ss.SSS
|
| Message | ${message} | The message with which the integrator task was finalized. | |
| Error message | ${errorMessage} | The error message with which the scheduled task was finalized. | |
| ETL job name* | ${etlJobName} | The name of the Integrator task. | |
| ETL project name* | ${etlProjectName} | The name of the Integrator project on which the task was performed. | |
| ETL job status code* | ${etlJobStatusCode} | The status code at the end of the Integrator task. | |
| ETL job status* | ${etlJobStatus} | The status at the end of the Integrator task, e.g: "Completed successfully". |
* Important: these variables can only be used for scheduled Integrator tasks.
Receiving warning messages from Integrator tasks
You can configure a success template to display more information regarding successful tasks that finish with warnings by using the following two variables in a Success template:
- ETL Job Status
- ETL Job Status Code
For example:
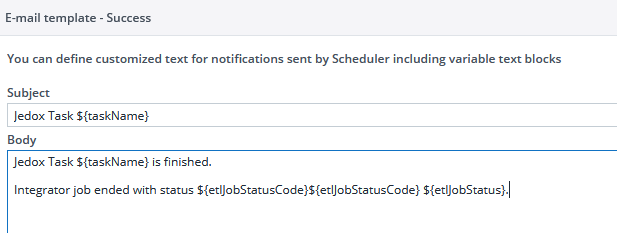
This template will return a message like the one in the example below:
Subject: Jedox Task Task_Test_Templates
Body: Jedox Task Task_Test_Templates is finished.
Integrator job ended with status 10 Completed successfully.
or
Subject: Jedox Task Task_Test_Templates
Body: Jedox Task Task_Test_Templates is finished.
Integrator job ended with status 20 Completed with warnings.
If a variable is left empty, the output will display the variable name.
Assigning templates to tasks
You can assign templates to the report recipients when you create a task. To do that, click on the template icon on the wizard and select the templates you want to assign for successful and failed tasks:

Additionally, you can send notifications to a custom e-mail address. In this case, only default templates are used.
For more information about scheduling tasks, see Scheduling Tasks for a Generated Batch and Scheduling Tasks as Integrator Jobs.
You can also assign templates from the Tasks section in the Scheduler. In the Notifications tab of every task you select, click the Template icon and assign the desired templates to the users you want. For batch PDFs, you can also select a group or several groups of users.
Updated June 12, 2026