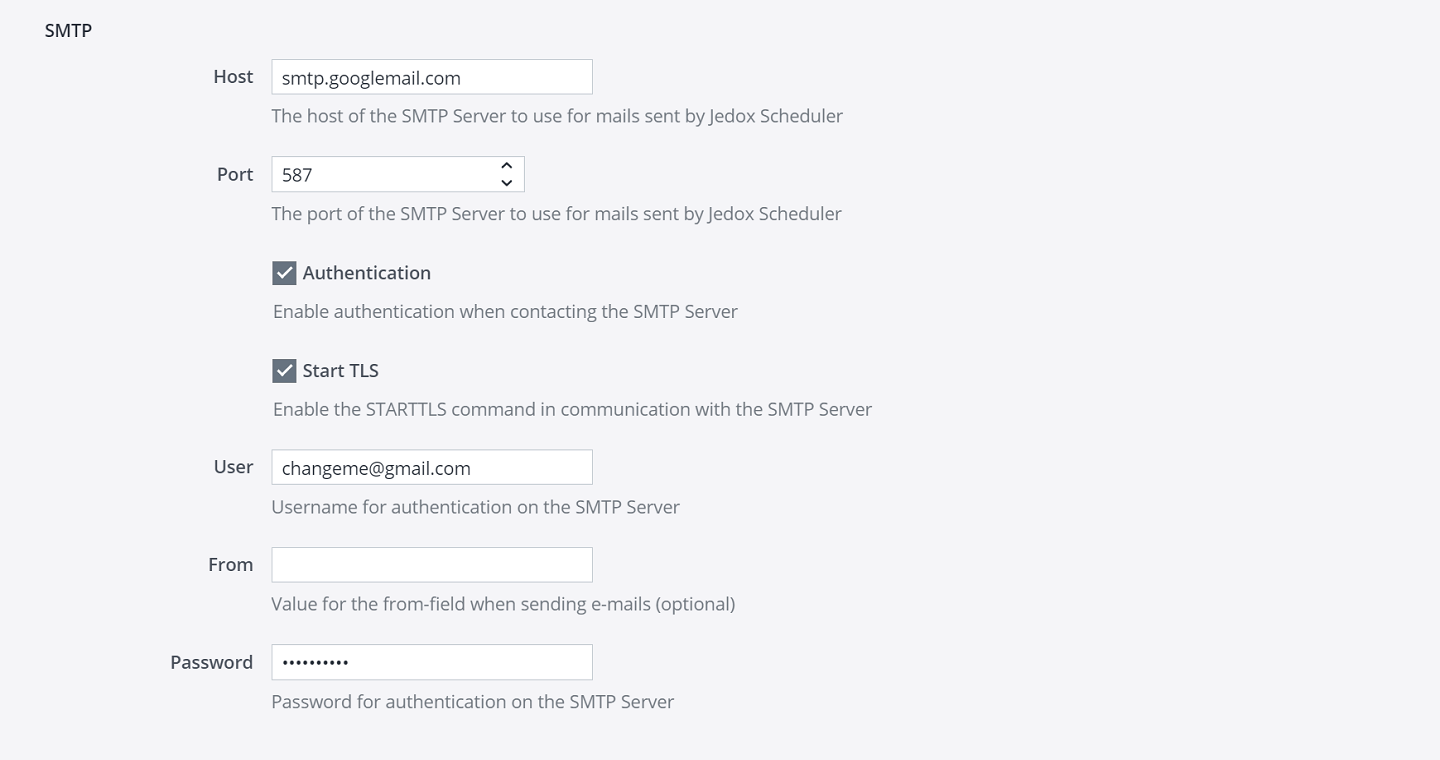
To be able to send emails in certain scenarios, e.g. to notify a user about the execution of a Jedox Integrator job or to distribute PDF reports, you must configure the SMTP setup in the Cloud Console.
For versions 24.1 and earlier, this configuration has to be adjusted in the Jedox Web settings.
Fill the Host section with the SMTP Server host that is used for sending mails through Jedox Scheduler.
Fill the Port section with the SMTP Server port that is used for sending mails through Jedox Scheduler.
The Authentication section enables authentication when contacting the SMTP Server. It is enabled by default.
The Start TLS section enables the STARTTLS command in communication with the SMTP Server. It is enabled by default.
Fill the User section with the user name that Jedox uses to authenticate the SMTP mail server. The user name must be a valid email address. The input of a user is mandatory.
The From field enables Jedox to work with an email proxy that requires authentication with a secondary SMTP property, whereby the field (User) specified during authentication is NOT equal to the field (From) used as sender.
Fill the Password section with the password of the user who authenticates on the SMTP. The password is stored encrypted. The input of a password is mandatory.
Enabling spoofing
Most email providers prohibit spoofing (email creation from a forged sender) because of security risks. It can, however, be beneficial in certain contexts. One such context is when you wish to send an email on behalf of someone else, particularly in an automated process, e.g. for a workflow process. Spoofing must be enabled through your email system and through Jedox. Contact your email provider if you need assistance enabling spoofing for your email system.
To enable spoofing through Jedox, you must first create a key. Go to: Administration → Settings and click Add key at the top of the page. Enter the following values in the Add Key dialog:
| Key | tasks.smtp.allow_spoofing |
| Type | Boolean |
| Value | TRUE |
When spoofing is used, the email will come from the address of the Jedox user who enabled the notification. When spoofing is not used, the email will come from the address set in "tasks.smtp.user" setting.
Sending email in Groovy Job via Webmailer
When trying to send emails in Groovy Job via a Webmailer, you might need the following key to convert the socket to TLS:
| Key |
tasks.smtp.ssl_protocols |
| Type | String |
| Valid Values |
Empty Value* TLSv1 TLSv1.1 TLSv1.2 TLSv1.3 |
* If an empty value is used in the key, it will be the same as if the key does not exist at all. This is the default behavior.
Configurable SMTP timeout for RPC / Scheduler
As a Jedox Web administrator, you can define a configurable timeout period (in milliseconds) for contacting the SMTP server when sending emails.
| Key | tasks.smtp.timeout |
| Type | Integer |
| Other variances of the Key value |
mail.smtp.connectiontimeout mail.smtp.writetimeout |
| Default Value | 10 minutes (600,000 milliseconds) |
Multi-factor authentication
When multi-factor authentication (MFA) is enabled for your mail account, it cannot be used out of the box for email notifications in Jedox.
For that to work, Microsoft offers usage of "App passwords" in MFA configurations; consult your Microsoft Administrator for details.
Currently, this can be configured by following the steps below:
-
Access your Office 365 account.
-
Go to "Security info" on the left-hand side menu.
-
Click on Add Method, select "App password" from the dropdown menu, and click Add.
-
Choose a name for the app password and click Next.
-
A password will be generated automatically. Copy the password to use it as SMTP password.
Updated July 21, 2025
