Return to Workflow Building Block Overview
The Workflow Wizard guides key users through creating and maintaining workflow tasks. In order to bring workflow funtionality to your native work environment, you must have a cube with at least three dimensions. Version dimension, the Time dimension, and the Step dimension. These dimensions define workflow tasks, for which the key user establishes deadlines and assigns user groups. This involves several steps, as outlined below:
Report Heading
The screenshot below shows the heading area of the Workflow Wizard report:
The logo can be changed in Administration; see Configuring Design Elements for more on report design. The heading also shows where you are in the workflow process (e.g. the "Cube Selection" stage, as above).
Cube Selection
The first step is to select a cube to which to add workflow functionality. Alternately you can modify an existing task. Both processes are explained in the upcoming section.
Task Definition
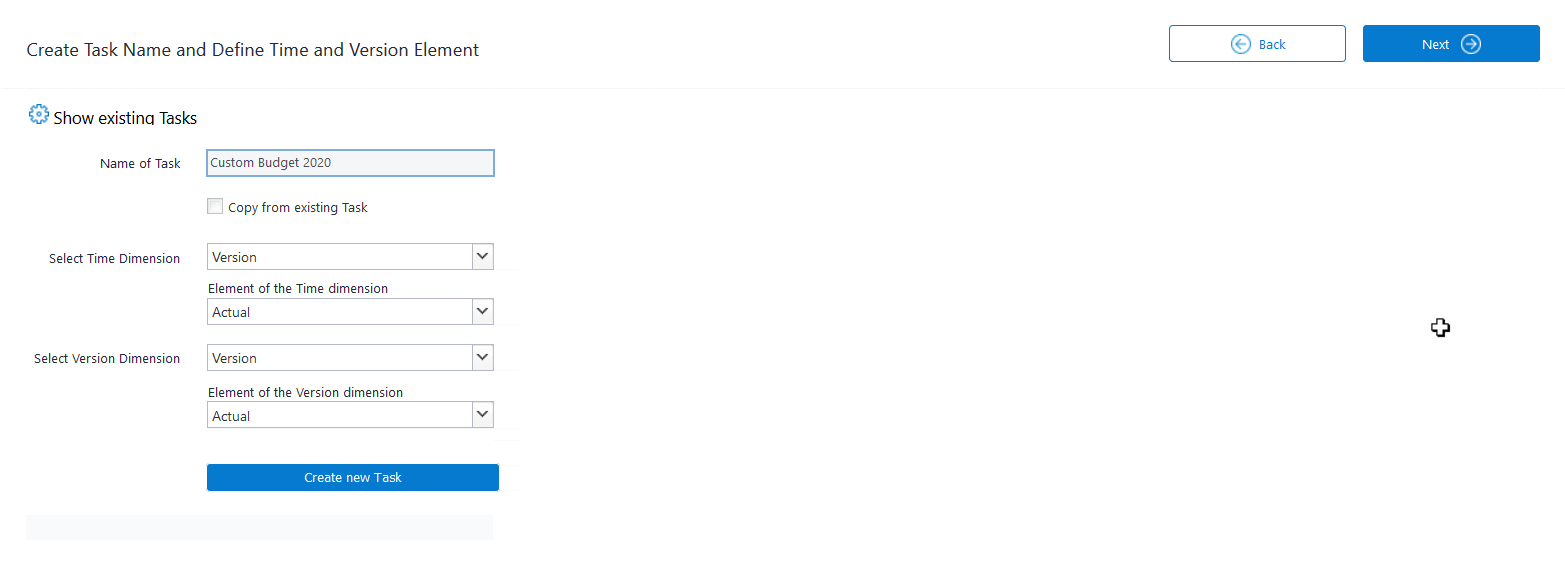
The next pivotal step takes data from your custom cube and renders it in workflow form. For the complete transfer to occur, the Workflow building block takes three dimensions and creates a task. For now you must select two dimensions and provide a task name.
The two dimensions in your custom cube become the Time and Version dimension in your custom application. Select one element in these dimensions. The workflow task will manage the data on this slice. Both dimensions and their selected elements are two of the many settings that define a workflow task.
Task definition may involve modifying an existing task or creating a new one. Show existing tasks allows you to modify old tasks, Hide existing tasks allows you to create new ones. The cog button switches between modes. Both modes and their capabilities are shown below.
Modify an Existing Task
| Field | Description | Implementation |

|
The cog button switches from two modes: "Show existing Tasks" and "Hide existing Tasks". Showing tasks allows you to modify them. | |
| Name of Task | Chose any existing task to modify. | Element name in the _WF Task dimension |
| Select Time Dimension | Name of the Time dimension in the cube, e.g. Month. |
Time Dimension attribute of the _WF Task dimension |
| Element of Time Dimension | The element that belongs to the Time dimension, e.g. 2020. |
Time attribute of the _WF Task dimension |
| Select Version Dimension | Name of the Version dimension in the cube, e.g. Version. |
Version Dimension attribute of the _WF Task dimension |
| Element of Version Dimension | The element the belongs to the Version dimension, e.g. Budget. |
Version attribute of the _WF Task dimension. |
Create a New Task
| Field | Description | Implementation |

|
The cog button switches from two modes: "Show existing Tasks" and "Hide existing Tasks." Hidings tasks allows you to create new ones. | |
| Name of Task | Enter a task name to create a new task. | Element name in the _WF Task dimension |
| Please define new task Name or Please define a different task name |
If the task name field is empty or the entered name conflicts with an existing task an error message appears and the Create Task button is hidden. The error disappears when a unique task name is entered and the field is left. | |
| Select Time Dimension | Name of the Time dimension in the cube, e.g. Month |
Time Dimension attribute of the _WF Task dimension |
| Element of Time Dimension | The element that belongs to the Time dimension, e.g. 2020. |
Time attribute of the _WF Task dimension |
| Select Version Dimension | Name of the Version dimension in the cube, e.g. Version |
Version Dimension attribute of the _WF Task dimension |
| Element of Version Dimension | The element the belongs to the Version dimension, e.g. Budget. |
Version attribute of the _WF Task dimension |
| Create new Task (button) | Click this button and you will have just created a new task. | Creates a new element in the _WF Task dimensionShown when a new, unique name is entered: When Copy from existing task is checked: Runs the wfmd03_20_Add_New_Task_from_template job in the Workflow Integrator project.Else: Runs the wfmd01_40_Add_New_Task job in the Workflow Integrator project. |
Define Step Dimension and Workflow Type
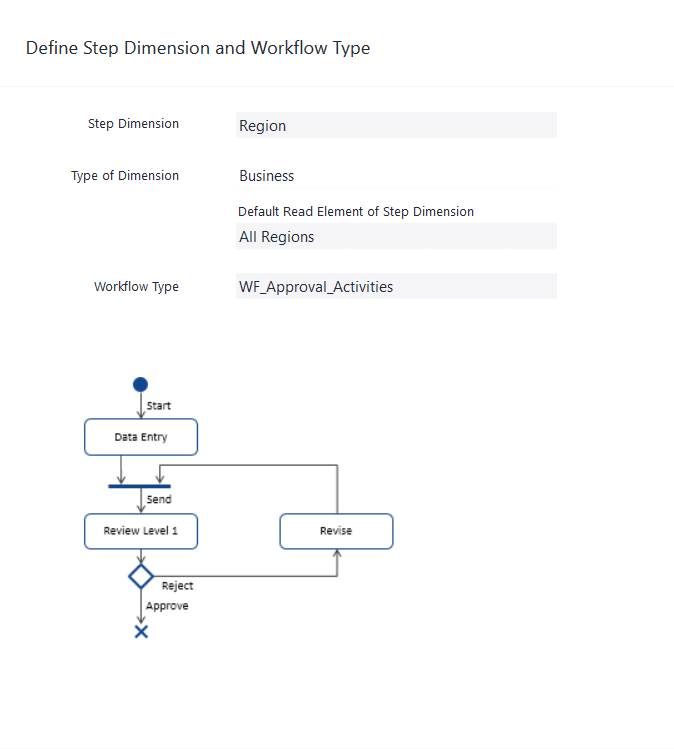
The step dimension is the main mover in the workflow. While the version and time dimension identify the data slice to operate on, the step dimension breaks the task down into steps. You can think of it as the tool that breaks down a large data set into smaller, more manageable packages (the Region dimension, for example, breaks down into countries, districts and so on). More importantly, however, the step dimension controls recipiency of these packages, assigning certain activities to certain user groups, and thereby streamlining the workflow process.
| Field | Description | Implementation |
| Step Dimension (combo box) | Click inside the combo box to select your step dimension. | One dimension of the Cube. |
| Type of Dimension (combo box) | Displays the dimension type. Dimensions are grouped in certain way based on the type assigned to them. | See article for more information the various dimension types and how they can be assigned to your custom database. |
| Default Read Element of Step Dimension | The workflow step dimension must have a Default Read Element defined for workflow to function. If this has not yet been defined in the dimension properties, y |
This field shows the dimension property which is also available in the Modeler. See Default Read Element |
| Workflow Type (combo box) | Displays workflow type (approval, one level approval, two level approval, or feedback). | Root element in _WF Activity dimension. |
| Workflow Diagram | Displays the Unified Modeling Language (UML) diagram of the workflow task. | There are several diagrams possible depending on the workflow type selected. The images are stored as Workflow Type.<Workflow Type>.png in the //Models/<Model Name>/Files/Images/ folder. |
Please note: the aggregation weight in the workflow step dimension must be 1. Parts of the workflow will not work with other weights (such as 0 or -1).
Define Email Notification
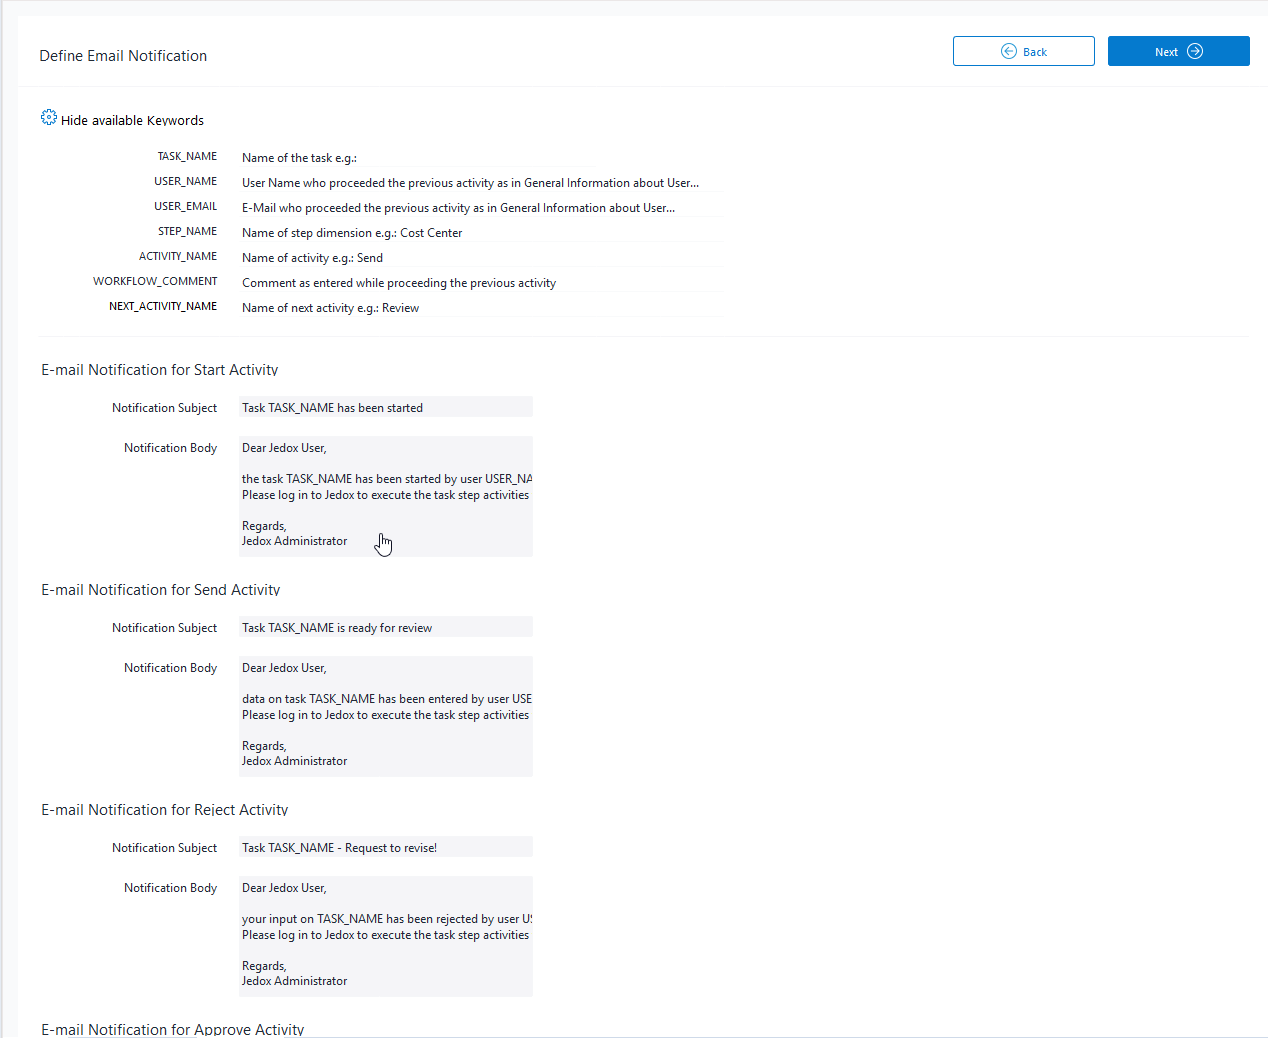
Emails are sent to user groups automatically. Email settings are shared across all workflows having the same workflow type. The subject and body of the notification email can be customized for each activity. The keywords are replaced automatically when emails are sent.
Key words are defined at the top of the page, but you may hide them with the cog button. They correspond with the general information about the user (which you can find to Administration → Users → <Individual User> → General), as well as the Task Definitions described above.
Define Due Dates
The next step is to set due dates for the workflow activities. Select the activity in the combo box, define due dates for each task activity separately, then click next:
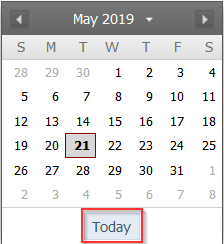
You can set due dates by clicking the calendar button and selecting a date:
Set the due date to the current date by clicking the Today button.
Step Dimensions Overview and Assignments
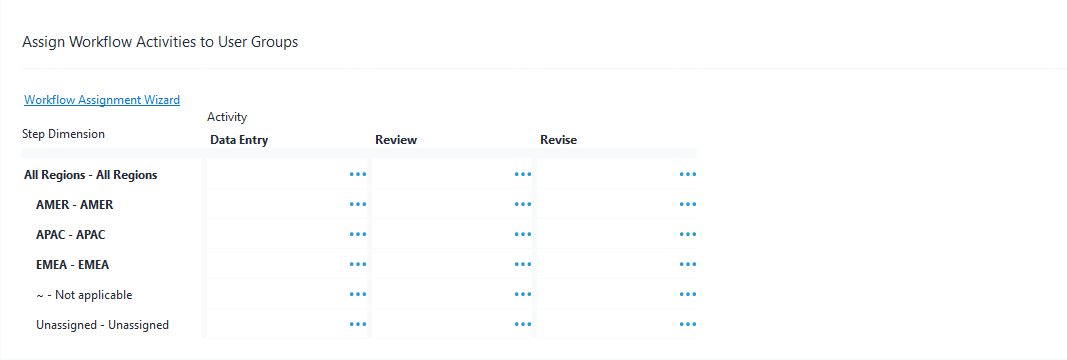
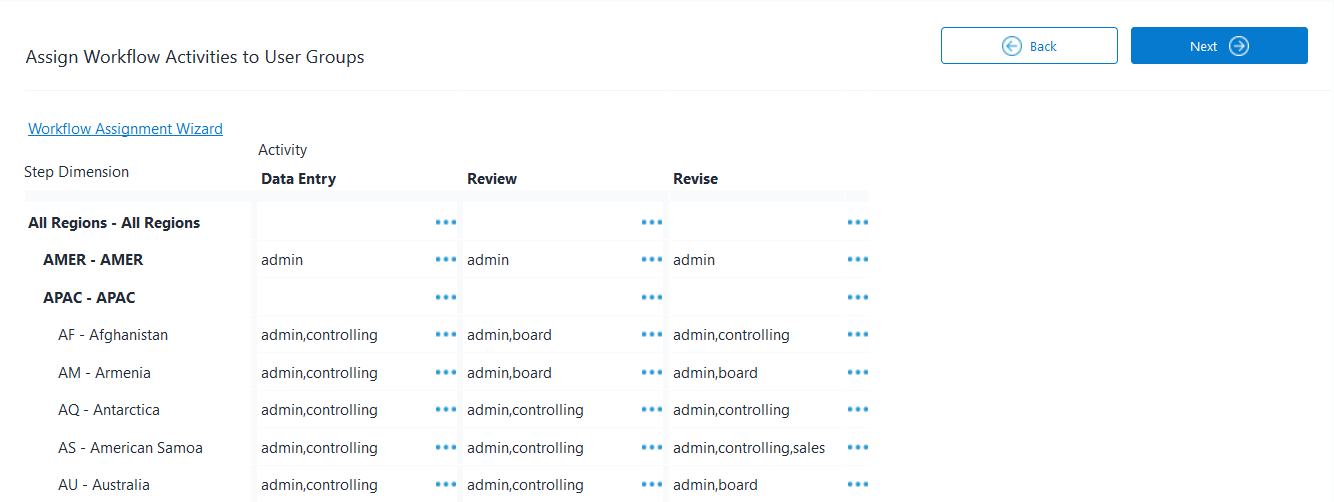
Now time for some refinement. You must assign specific elements of the step dimension to the specific user groups. The Region Dimension, again, as an example:
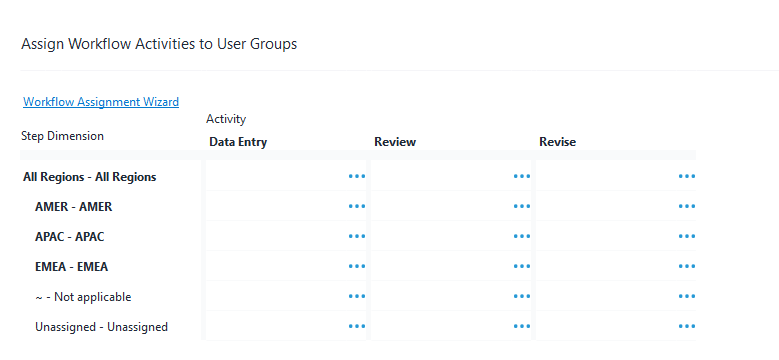
The step dimension and its elements are displayed in the first column, the activities on the first row. Click the ellipsis (  ) to assign activities to user groups manually. Alternately, you can copy current or previous assignments by using the Workflow Assignment Wizard.
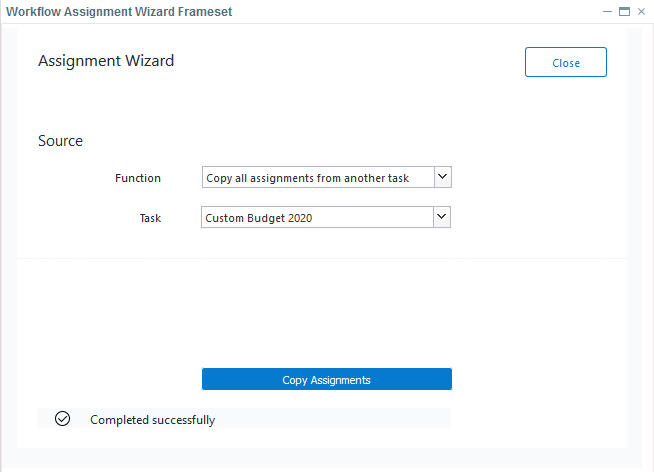
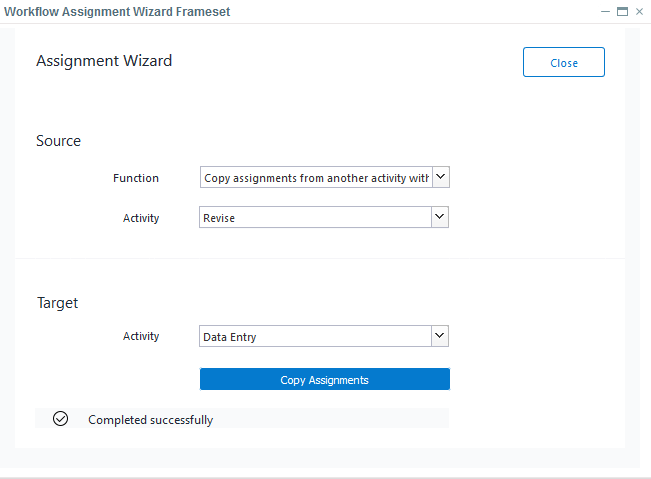
The Workflow Wizard offers two functions. Select your choice in the Function combo box::
1.) Copy all assignments from another task to the current task. This defines the assignments of all activities at once:
2.) Copy the assignments from one activity to another activity within the current task, e.g. set the Revise task to the same assignment as the Data Entry task:
However you select your assignments, they will update in the overview as shown below.
We have expanded the region element APAC (Asia-Pacific) into country elements (AF - Afghanistan, AM - Armenia, etc.). Your custom application may, of course, require more or less specification.
Assignments can be made on any level, not just the base level. You will want to make sure, however, that assignments made on different levels do not overlap (AF and APAC, for instance). When you are satisfied with your constellation of task assignments, click to the next step.
Define Reports for Activities
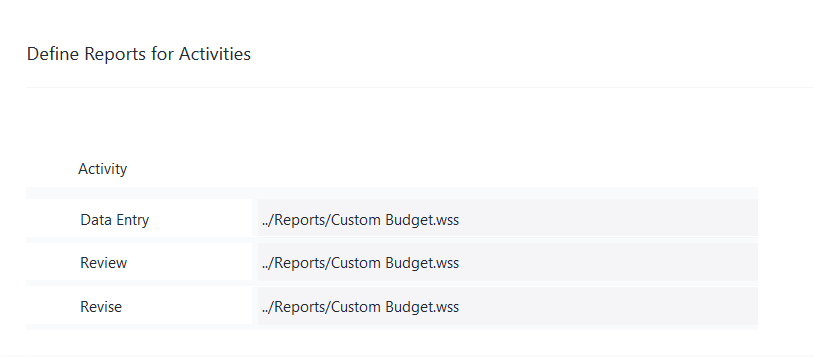
Once you have fine-tuned your assignments, it is time to define the reports used for activities:
We have used the Custom Budget report as an example, but of course you will use your own custom report. A relative hyperlink is an especially efficient shortcut to use, see article.
Workflow Control
Now the workflow task is ready for implementation; the key user need only control its process. They do so through the control panel below.
The available options and visualizations are described below:
| Field | Description | Implementation |
| Select a Task | Select the workflow task to set up a plan for. This is related to the reports where users will enter planning data. | Select elements of dimension _WF Task . Additional elements can be added to the dimension to represent other workflow tasks. To ensure that it is working with planning reports define the element name as described in the _WF Task Dimension article. |
| Reset Workflow (button) | Stops workflow process that is underway and clears the status and the history. | Deletes all state and history information from the _WF Status (<Workflow Step Dimension>) cube. The properties of the workflow task stored in the _WF Task Definition cube and the assignments stored in the _WF Task Assignments (<Workflow Step Dimension>) cube will stay intact. The operation is encapsulated by the workflow_reset_task() function in the workflow.php library. |
| Start Workflow (button) | Starts a workflow process from the beginning or starts a paused or stopped workflow process again. | Sets the State and other measures in the _WF Status (<Workflow Step Dimension>) cube. The operation is encapsulated by the workflow_start_task() function in the workflow.php library. |
| Pause Workflow (button) | Pauses a running workflow task. The paused workflow process activates cell protection in the planning reports. A paused workflow process can be started again with the Start button. | Sets the State and other measures in the _WF Status (<Workflow Step Dimension>) cube. The operation is encapsulated by the workflow_suspend_task() function in the workflow.php library. |
| Stop Workflow (button) | Stops a running or paused workflow task. A stopped workflow task can be started again with the Start button. A stopped workflow process removes any workflow-related cell protection and blocks the progress of the workflow. Cell functions will work as stated within the cell locking section of the planning report articles. | Sets the State and other measures in the _WF Status (<Workflow Step Dimension>) cube. The operation is encapsulated by the workflow_disable_task() function in the workflow.php library. |
| Status of Workflow | See the status of the workflow process for various activities (e.g. Data Entry, Review, and Revise). | Shows the share of activities on the root step of the workflow step dimension. The shares are read from the he Active Rate measure for all user activities and the Finished Rate measure for the final system activity in the _WF Status (<Workflow Step Dimension>) cube. These are taken from the the ~ (Not applicable) element in the Event dimension. The root step of the workflow step dimension is encapsulated by the workflow_root_step() function in the workflow.php library. |
Updated July 3, 2025


