You can use the Name Manager dialog to review, edit, and organize all defined names in your workbook, including named ranges and constants. If you need guidance on how named ranges differ from variables, see Working with Named Ranges and Variables.
To open the Name Manager dialog in a spreadsheet, go to the Formulas tab and click Name Manager.
Dialog Overview & Functionality
The dialog is divided into three main areas — see below for a description of each.

Area (1): Controls
Area (1) allows you to control options like creating a new named range, editing an existing one, deleting a named range, and filtering named ranges.
New...
With this button you can open the New Name dialog. In this dialog, all fields are mandatory except the optional Comment field.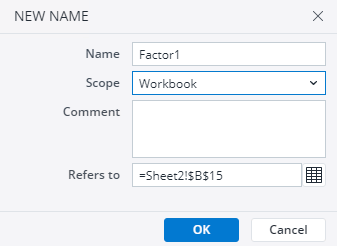
-
Name: You can choose a name for your named range.
-
Scope: When creating a new name, you can choose its scope — either the entire workbook (global) or a single sheet (local). By default, scope is set to Workbook.
-
Refers to: In this field you can define what the named range refers to:
-
A spreadsheet range — you can click Select range
 to highlight cells, then click End select range.
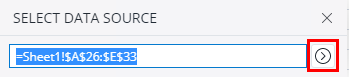
-
A constant — type = and then the constant value.
-
A formula — type = and then the formula.
-
Edit
Opens the Edit Name dialog to modify existing names. Note: the Scope of a name cannot be changed after creation. When you edit a name, all references in the workbook will automatically update.
Delete
The Delete button removes the selected name(s) in Area (2) without requiring further confirmation. You can delete either a single name or multiple names simultaneously. There are two methods for deleting multiple names:
-
Contiguous Selection: Click on the first name, then hold the SHIFT key and click on the last name.
-
Non-contiguous Selection: Hold down the CTRL key and click on each name you wish to select.
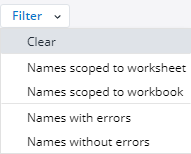
Filter
Allows you to quickly filter names displayed in the table using the dropdown menu. The available filters are:
-
Clear: Deselect a selected filter.
-
Names Scoped to worksheet: Show only locally scoped names
-
Names Scoped to Workbook: Show only global names
-
Names with Errors: Show names whose definition has errors (e.g. #REF!, #VALUE!, or #NAME?)
-
Names Without Errors: Show names whose definitions are error-free
Area (2): List of Defined Names
The second area of the Name Manager dialog displays all defined names in a structured table, allowing you to quickly review, sort, and manage existing named ranges and constants. Each column in the table provides specific information (such as the name, scope, value, and comment), and you can customize the view to show or hide the columns you need. The table also supports sorting and visual indicators when changes are made.

Key functions in this area:
-
You can sort the table by clicking any column header; clicking again toggles between ascending and descending order.
-
Columns can be shown or hidden by using the check/uncheck options in the column menu.
-
To auto-fit a column to the longest content, double-click the right border of the column header.
-
Red triangles (2a) appear next to modified items, indicating that changes have been made but not yet saved.
Area (3) : Refers To
When you select a name from the list, the Refers to field shows its current definition. You can directly edit the cell range, constant, or formula in this field. Then you can either save or discard the changes.
Once you’re done, click Close to return to the worksheet.
Updated April 29, 2026