Framesets enable users to display multiple files in a frameset, or a single window. The files must be tagged before they can be used in the frameset.
To tag a file as a frame:
- In Designer, right-click on the object you want to use in the frameset.
- In the context menu, select Mark/Tag... > As frame.

To create a frameset:
- In Designer, click New > New frameset.

-
The Templates option enables users to choose between a Vertical, Horizontal, or Custom arrangement of the frameset.

-
The Custom option allows users to set a desired size for both vertical and horizontal frames. Users can also set the number of rows and columns, depending on the template they need.
- It is also possible to set the size of each frame. The following options are available for both width and height:
px Sets the size in pixels. The size of the frame does not change with the screen settings. % Sets the size in percentage. The size of the frame changes based on the size of the screen. auto The frames set on auto adjust their size based on the screen dimensions, and the size of the other frames. - Click on the Insert File icon in the frameset menu.

The files that are tagged as a frame are displayed. Users can choose to insert the file and keep it marked as a frame for further use (Insert) or remove the tag after inserting the file (Insert and untag).
Do not load duplicate files. In addition, files loaded as frames in the frameset should not be defined as resource workbooks for another frame in the frameset at the same time. - It is possible to change a frame's properties by clicking on the Frame Properties button
 .
.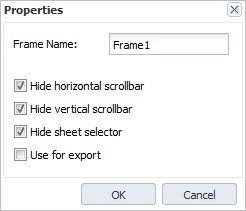
- Hide horizontal scrollbar: the horizontal scrollbar is not shown in the frame.
- Hide vertical scrollbar: the vertical scrollbar is not shown in the frame.
- Hide sheet selector: the sheet selector is not shown in the frame.
- Use for export: for export as XLSX-Snapshot or HTML, only one frame can be established. For PDF export, see below. If left unchecked, the frame for the export is randomly selected.
The checked options in the frame properties take effect only in the User Mode.
To see an example of framesets’ usage, look here.
It is possible to handle named ranges and see a list of every named range set in the workbook through the Name Manager. To access the Name Manager, select a frame and go to Insert > Name... Please note that while working in a frameset in the Report Designer, it is not possible to use the Name Manager in one frame and select the ranges from another frame as a source.
Note also that in a frameset where one of the reports in a frame uses multiple sheets, when switching to another sheet for the first time, only the content for this sheet will be fetched and calculated. Other frames then will not be calculated. On subsequent changes of the sheet, the entire frameset will be recalculated.
Exporting framesets as PDFs
In a frameset, it is possible to select several frames to be exported as PDFs. To do this, check the Use for export option in the frameset properties.

It is possible to adjust the orientation, scaling, and paper size of the PDF export. To do this, after opening the frameset in the Report Designer, click on the Frameset Page Setup option.

Using the Fit to… option currently only allows the 1×1 setting. When used, the PDF will consist a single page, showing the original size of the frameset content.
Print range settings from individual frames will be ignored if the PDF consists of multiple frames.
Note also that some frameset configurations cannot be exported to PDF. Exporting one frame or all the frames always works. For other combinations, make sure that the left-most frame in the horizontal plane is always included in the export. This allows the other frames to be exported as well. For example, in a PDF export containing 2 x 2 framesets, exporting only the two frames on the right does not work.
Updated March 30, 2026