The dimension interface provides an easy way for uploading data into a dimension or downloading data from it once or repeatedly. The interface can use various file-based sources (e.g. CSV or XLSX files). You can initiate the upload / download from the Modeler. Additionally, you can execute the process once, or retain as an Integrator job and schedule it as a repeating task.
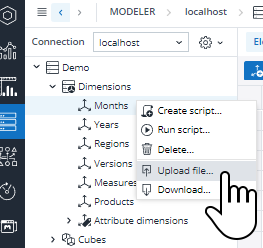
You can call up the interface for uploading / downloading dimensional data from the Jedox Web Modeler, via the context menu of a specific dimension:
Uploading a dimension file
To upload a dimension file, follow these steps:
- In the Jedox Web Modeler, right-click on a dimension to display the context menu and select Upload File...The Dimension Upload Wizard is displayed.
- Select the source location. This can be the local file system of your PC or the Jedox Report Designer.
- Specify the file type: Text, Excel or WSS.
- Select whether to run the upload once or as an ongoing Integrator job. If you choose to save it as an Integrator job, you will be prompted later to configure the job; in this case, the file will be visible under the Integration folder in the Designer tab. Click Next.
- The file will upload and you'll get a preview of the file columns with the default settings (you may need to expand the dialog window to see the preview).

Note: Make sure the file data generally matches one of the two hierarchy types: - Full hierarchy or Parent-child hierarchy. For more information about the two types, see the table below.
- Click on the dropdown list for each column to match them to the data structure of the dimension. The default mapping level for dimension uploads is 8, but it can be customized, as shown below. You can generate a new preview by clicking Refresh.
- Click Next. On this window, you can set up what happens to the elements without parents in the source and whether multiple parents with a single hierarchy are allowed. If you opted not to save the upload as an Integrator job, click Finish to complete the import. Otherwise, click Next.
- If you opted to save the upload as an Integrator job, complete the final dialog to create the task and click Finish.
| Hierarchy format | Description |
| Parent-Child | You must select which columns hold parents, children and weights. You can map other columns to attributes. The Dimension Upload Wizard recognizes certain column names and assigns them to the correct mapping. The column names :parent, :child and :weight are recognized. If a column name matches an existing attribute in the dimension, it will be mapped automatically. To map a column to a localized attribute, the naming syntax <attribute>@locale is recognized automatically, e.g. color@fr_FR. All mapped columns will show bold-italic formatting in the column header. |
| Full Hierarchy | You must define which columns represent which level in the targeted dimension hierarchy. The other columns can be mapped to attributes. You can also create an attribute on the fly. |
Note: If you want to update an existing dimension in the Modeler by uploading a file, make sure that your Excel document gets the same table name (sheet name) as the one in Jedox.
Downloading a dimension
To download a dimension file, follow these steps:
- In the Jedox Web Modeler, right click on a dimension to display the context menu and select Download...The Dimension Download Wizard is displayed.
- Click ... to select the specific elements that you want to download:

- Click Next.
- Select the hierarchy format and the type of the file you're downloading.
- Click Next to select the CSV settings and to get a preview of the columns you want to export.
- Click Next to select whether to run the upload once or as an ongoing Integrator job. Additionally, you can decide whether a recurring scheduled task is generated from the execution.
Updated April 29, 2026