Jedox Spreadsheet is a browser-based spreadsheet program, similar to common spreadsheet programs such as Microsoft Excel and OpenOffice.org Calc. In addition, Jedox Spreadsheet has been enhanced to read and write data directly from Jedox In-Memory DB and to create appropriate reports.
A Jedox Web Spreadsheet allows a maximum 65,536 rows and 256 columns. These limits also apply when pasting a Jedox View in Jedox Web, or expanding rows or columns in a View. Operations which exceed these limits (the "sheet boundaries"), such as moving objects (buttons, comboboxes, charts etc.) during expansion of elements in DynaRanges, or referencing cells outside these limits, are not possible and may yield error messages.
The Jedox Web Spreadsheet does not support the "R1C1" cell reference syntax (cell addresses with enumerated row/column reference).
Creating a New Spreadsheet
The quickest way to create a new spreadsheet is to click the Report button on the Jedox start screen. You will receive an empty workbook.
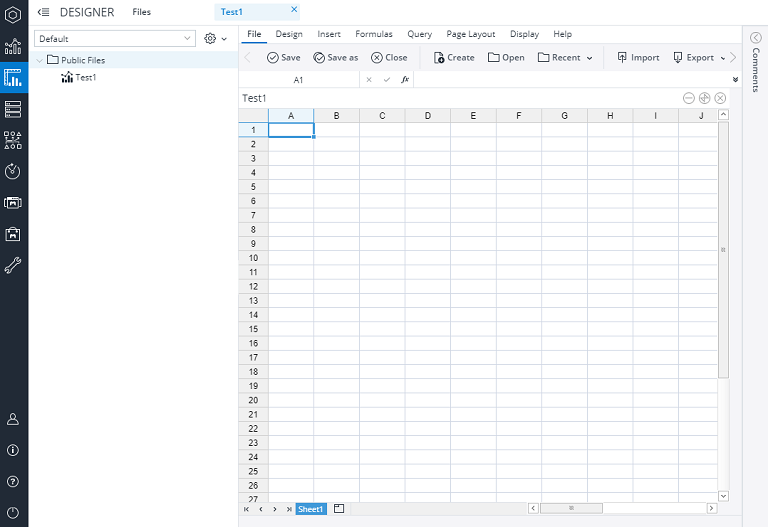
Or you can navigate to Designer > Default > Public Files on the left-side navigation pane. Then click on New > New spreadsheet in the Designer window: 
Name the file "Test1" and start it with a double-click:
You can modify the spreadsheet using the Ribbon toolbar.
Hiding and unhiding sheets
You can hide specific sheets in a workbook. This allows you to add meta content which is not meant for a resource workbook. Hiding simplifies the workbook design process.
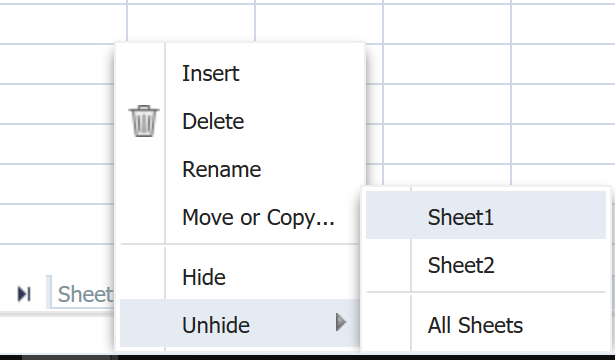
To hide a sheet, right-click it on the sheet selector in Designer and select Hide. The sheet is no longer visible in Reports, Designer and the generated PDFs. To view and edit the sheet again, right-click any sheet on the sheet selector in Designer and select the sheet you want to display. You also have the option to display all the hidden sheets:
When using the Find command (CTRL+F) in Jedox Web, you have the option to search the entire workbook. To enable this, select Options on the Find and Replace window. On the Within option, select Workbook.
In Jedox Web, this option will include the hidden sheets as well. In the Excel Add-in, hidden sheets will not be included in the search results.
Context menu command "Show Error"
With right click on a Jedox Spreadsheet cell you can select the command "Show Error". This command brings up the Cell Error message window. If Jedox recognizes an error, you will receive a more accurate error message. If Jedox recognizes no error, you receive the message: "No error message found".
Using the Color Picker
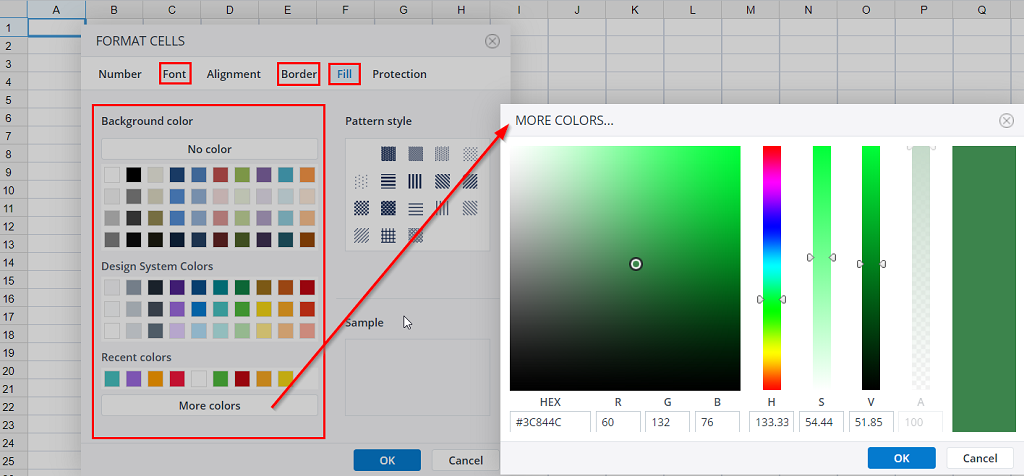
The Color Picker can be used for fonts, cell borders and to fill cells.
You can start the Color Picker in the simple ribbon by clicking red buttons indicated in the screenshot below:
or with right-click in a spreadsheet cell and select Format cells...
Colors that have been applied on elements in the spreadsheet are indicated in the Color Picker, both in the toolbar and in the corresponding FORMAT CELLS dialog tabs.
The Color Picker displays two color sets: standard colors and design system colors. The latter includes colors that are part of the Models design system.
Furthermore there are displayed recent used colors. The last ten colors chosen by individual users are retained by the Color Picker, even after logout/login.
And you can use the button "More colors" to define your own color.
Defining Styles for Jedox Spreadsheets
In Jedox Spreadsheets, styles are configured very much like in other commonly used spreadsheet programs.
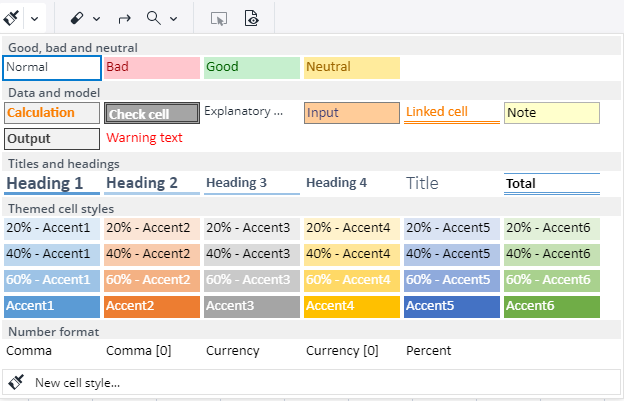
You select the area to which you wish to apply a style and click on the Cell styles icon in the Design toolbar :
:
Jedox additionally offers support for inheritance between workbooks, meaning that you can create a consistent look across all of your reports. You can define styles (colors, number formats, etc.) for a spreadsheet, and use the style on several cells in the spreadsheet. Any change of the style will then be reflected in all cells where it is used.
If a spreadsheet has another spreadsheet defined as a resource, all styles that are defined in the resource are automatically inherited by the spreadsheet and can be used there.
Constraints for merged cells' usage
-
Suppose a user scrolls horizontally or vertically in a report so that a merged cell becomes only partially visible. In that case, the cell's content is not shown anymore until the user scrolls back.
-
When merged cells intersect with borders of frozen panes in a Web Spreadsheet, the merged cell is truncated.
-
On some displays, merged cells combined with cell background colors can show visual glitches (such as thin white lines).
-
The "Format Painter" does not copy/paste merge information.
-
Like Microsoft Excel, Jedox Spreadsheet does not support creating arrays in cell ranges that include merged cells.
-
In a Jedox Web Spreadsheet cell that is formatted as a percentage, typing a number without specifying the "%" character results in the value being interpreted as a percentage value. For example, entering "50" in such a cell shows 50% in the cell (0.5 being the actual cell value). The result will also be the same when entering 50% in such a cell. This behavior is aligned with Microsoft Excel.
-
Pressing the Menu Key
 on your keyboard while you are in Jedox web opens the context menu. However, it is not possible to choose the options with arrow keys, and you can only use the mouse in this case.
Updated January 8, 2026


