You can connect to Jedox OData Hub in PowerBI Desktop by using the built-in OData Connector. There are two different ways to connect to the service: flat API and Hierarchical API.
The Flat API has been designed to be as simple as possible. Cell and dimension information is available from a single table and can be imported with just a few clicks. The flat API only contains the cell and dimension data.
The Hierarchical API has some additional information about the available cubes, views, and dimensions. When building complex models, the Hierarchical API may be more appropriate.
Fetching data with the Flat API
Connecting to the OData Service
In Power BI Desktop, you can connect to the Jedox OData Service by using the built-in OData Connector. Click on Get Data and select OData feed, as shown below:

In the next dialog, enter the URL to your OData service, followed by the database name. It should match the following syntax:
https://odata.{InstanceId}.cloud.jedox.com/{DatabaseName}If you wish to connect to an Integrator Project, use:
https://odata.{InstanceId}.cloud.jedox.com/{IntegratorProjectId}For projects under "Global projects", the ID is the project name. For projects contained in Models, the ID can be found in "Properties".
Make sure the URL begins with https:// and click OK:

If you are not yet authenticated, another dialog will appear, prompting you to log in. Select "Basic" authentication and use your Jedox credentials to continue. Note: organizational account and other options are not supported at this time, but may appear in a future update of the OData Service.

Upon successful connection to the server, the Navigator will open. If you connected to a database, select the cube, views, and dimensions you want to import and click Load.
If you connected to an Integrator Project, select the transforms you wish to import and click Load.

Power BI will fetch the selected tables. This operation may take several minutes, depending on the size of the tables.
Configuring relationships
This is only relevant if you're working with OLAP databases. When importing tables, Power BI will automatically build relationships between the tables. These generated relationships may be incorrect, so check that the dimension tables are connected from the Name column to the cube or view column containing the name of the dimension:

Rebuilding dimension hierarchies
This information is relevant if you're working with OLAP databases.
To use a dimension hierarchy built in Jedox, the dimension must be imported and its relationship to the cube/view must be set up correctly, as shown above.
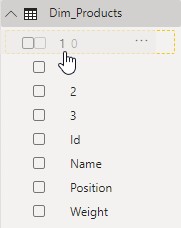
Go to the Report tab and locate the dimension table in the fields list. Each dimension table contains one or more hierarchical columns named from 0-n. To build the hierarchy, you must have at least two hierarchy columns. Simply drag and drop column 1 into column 0 to generate a hierarchy:
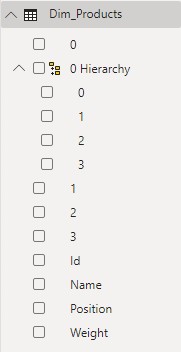
Then drag and drop the remaining hierarchy columns into the newly generated hierarchy:
Optionally, you can rename the hierarchy to something more meaningful.
Hierarchical API
Connecting to the OData Service
In Power BI Desktop, you can connect to the Jedox OData Service by using the built-in OData Connector. Click on Get Data and select OData feed, as shown below:
In the next dialog, switch to the Advanced view and enter the URL to your OData Service in the URL parts field, using the domain of your Cloud instance. Check Include open type columns at the bottom of the dialog and press OK.

Upon successful connection to the server, the Navigator opens.
OLAP databases
Select "Databases" on the left side and click Transform Data.
![]()
If you are not yet authenticated, another dialog will appear, prompting you to log in. Select "Basic" authentication and use your Jedox credentials to continue. Note: organizational account and other options are not supported at this time, but may appear in a future update of the OData Service.
In the Power Query Editor, you should now see a list of databases. You can use the “Table” links (indicated below) to navigate into cubes, dimensions, and views.

Loading cell data
Both cubes and views contain a list of cells. To load the cell data, navigate into the desired cube or view, and then into Cells. The Cells table contains the following columns: Path, Values, String Values, and More Columns. More Columns contains the element names of each row. To expand it, click the expand button  in the header. In the dropdown menu, make sure that all columns are checked and click OK. Optionally, you can also uncheck the checkbox "Use original column name as prefix" to prevent renaming of the columns.


Cells tables from both cubes and views support the following custom query options:
- baseonly: if set to true, the service will query base elements only (not consolidated elements). This is turned off by default for views. For cubes, this is turned on by default.
- userules: defines if the values should be calculated using rules. This is turned on by default.
Note that changing these options might have a negative impact on the performance. See an example in Using custom query options.
Loading dimension elements
Dimension elements contain the hierarchy and the attributes of each element. To load the elements, navigate into the desired dimension, and then into Elements. The Elements table contains the following columns: Type, Name, ID, and More Columns. More Columns contains the hierarchy of the elements in the Full Hierarchy format. To expand it, click the expand button in the header. In the dropdown menu, make sure that all columns are checked, and click OK. Optionally, you can also uncheck the checkbox "Use original column name as prefix" to prevent renaming of the columns.


After applying the data to your Power BI model, you can create a hierarchy from the hierarchy columns.
In the Report tab, drag each of the hierarchy columns into each other to create a hierarchy. You can do this using either the ID columns or the name columns.

Using custom query options
Currently Power BI does not allow you to enter custom query options out of the box. To work around this, you need to enter the full URL to the cells/elements. Find the ID of the databases and the cube, dimension, or view. Click on Get Data > OData feed and enter the full URL.
The full URL to a Cells table with the userules option should look like this:
https://odata.live-myinstance.cloud.jedox.com/Databases({id})/Cubes({id})/Cells?userules=falseYou can also combine multiple options like this:
https://odata.live-myinstance.cloud.jedox.com/Databases({id})/Cubes({id})/Cells?userules=false&baseonly=false
When entering the URL in the dialog, make sure to check the "Include open type columns", and click OK.


Integrator Extract and Transform data
Select "Integrator" on the left menu and click Transform Data.

If you are not yet authenticated, another dialog will appear, prompting you to log in. Select "Basic" authentication and use your Jedox credentials to continue. Note: organizational account and other options are not supported at this time, but may appear in a future update of the OData Service.

In the Power Query Editor, you should now see a list of project groups. You can use the "Table" links (indicated below) to navigate into a project group. Usually, you should choose "Global Projects", unless the project is contained in a Model.

Navigate either into the Extracts or Transforms of your project by clicking the "Table" link. Then navigate into the Rows of the Extract/Transform by clicking the Table link.
The Rows table contains the columns ID and More Columns. More Columns contains the actual data of the Integrator rows. To expand it, click the expand button in the header. In the dropdown menu, make sure that all columns are checked and click OK. Optionally, you can also uncheck the checkbox "Use original column name as prefix" to prevent renaming of the columns.


Troubleshooting
Users may need to clear the PowerBI cache to ensure proper data refresh. This can be done by navigating to File -> Options and Settings -> Data Load.
![]()
See also:
Updated April 29, 2026